Week 6 Embedded programming
Individual assignment
Write a program for a microcontroller development board that you made, to interact (with local input &/ local output devices)
Instructions
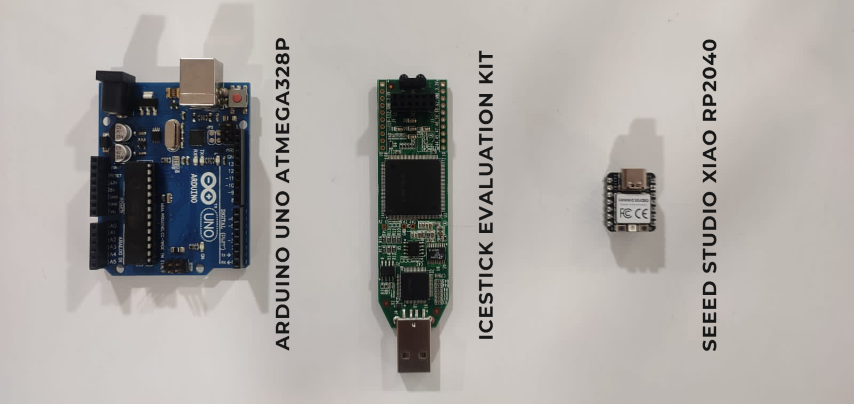
Saheen explained to us about the basics of embedded programming.
Embedded programming
Embedded systems programming, also known as embedded programming, facilitates the development of consumer-facing devices that don't use conventional operating systems the way that desktop computers and mobile devices do.
Preprocessing:
Preprocessing is an initial phase to process text before compilation. Preprocessor directives are lines of the source file where the first non-whitespace character is # , which distinguishes them from other lines of text.
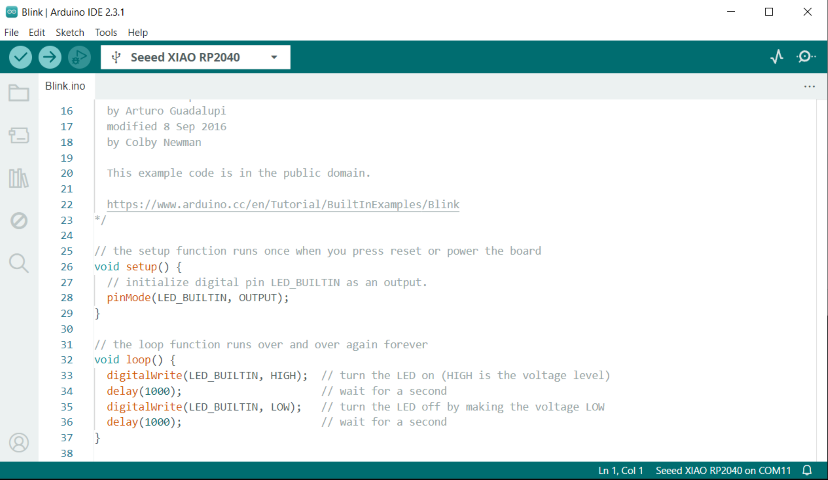
We tried using the examples provided in the Arduino to understand the working of programs. As someone with no idea about emebedded programming this turned out to be a very useful exercise.
First I tried using the blink example File>Example>Basic>Blink
Algorithm
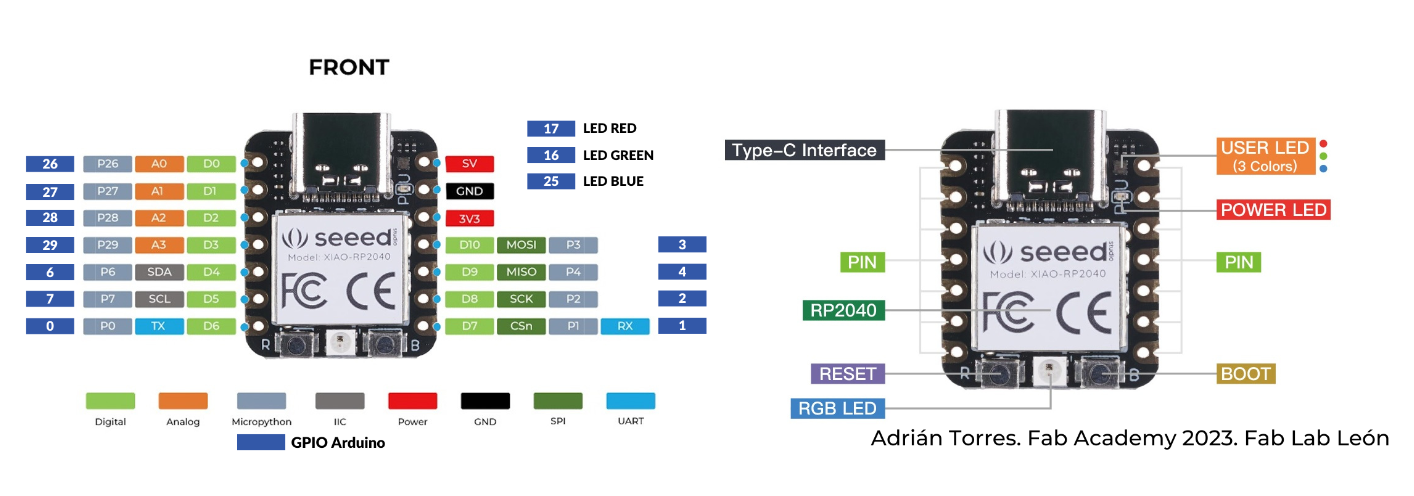
Step1:- set pin 26 as Output for LED 1
Step2:- set LED1 On
Step3:- 1 second delay
Step4:- set LED1 Off
Step5:- 1 second delay
Step6:- go to step 2
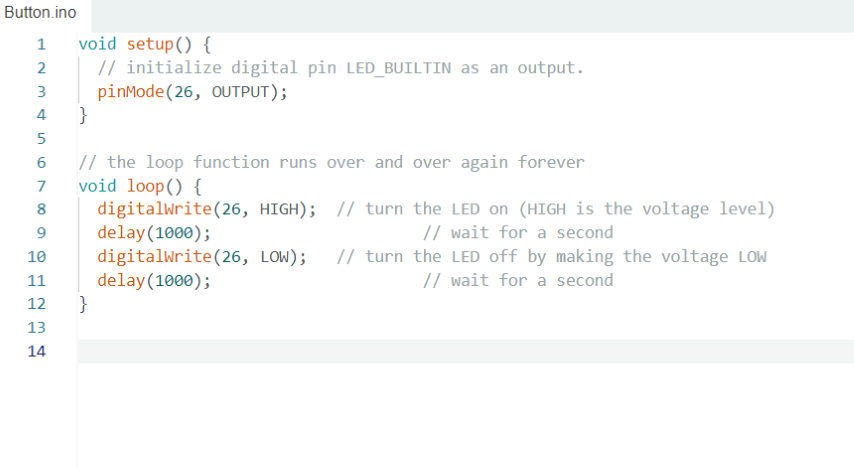
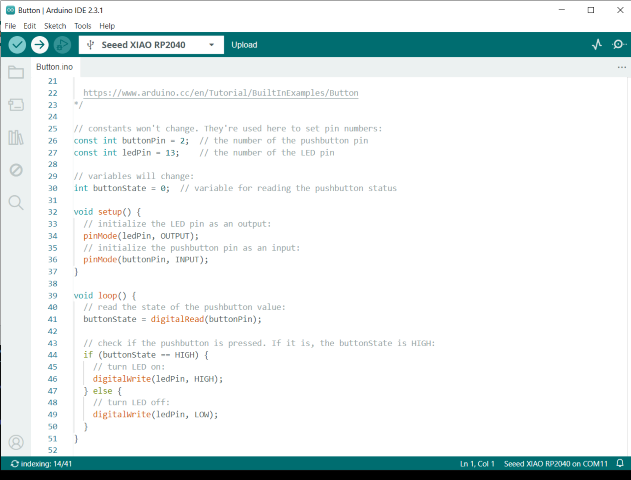
Then I tried using the button Example. File>Examples>Digital>Button
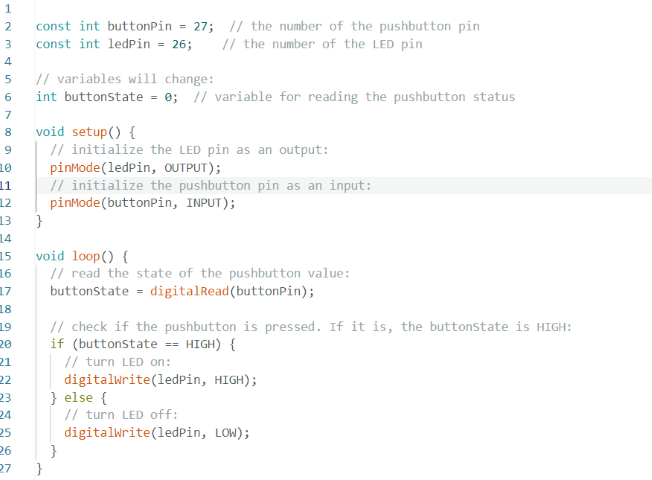
const int buttonPin = 27;  // the number of the pushbutton pin
const int ledPin = 26;    // the number of the LED pin

// variables will change:
int buttonState = 0;  // variable for reading the pushbutton status

void setup() {
  // initialize the LED pin as an output:
  pinMode(ledPin, OUTPUT);
  // initialize the pushbutton pin as an input:
  pinMode(buttonPin, INPUT);
}

void loop() {
  // read the state of the pushbutton value:
  buttonState = digitalRead(buttonPin);

  // check if the pushbutton is pressed. If it is, the buttonState is HIGH:
  if (buttonState == HIGH) {
    // turn LED on:
    digitalWrite(ledPin, HIGH);
  } else {
    // turn LED off:
    digitalWrite(ledPin, LOW);
  }
LED Button ALgorithm
Step 1 set pin 27 as output for button
Step 2 Set pin 26 as output for LED 1
Step 3 set LED 1 as output
Step 4 Set Button as input
Step 5: Button state is set as LOW by default
step 5. If button is pressed, LED turns ON , Got to step 7
Step 6: LED turns OFF
Step 7: Go to step 5
Then we tried incooperating Flag
const int buttonPin = 27;  // the number of the pushbutton pin
const int ledPin = 26;    // the number of the LED pin
bool flag = false;
bool pressed = false;
// variables will change:
int buttonState = 0;  // variable for reading the pushbutton status

void setup() {
  // initialize the LED pin as an output:
  pinMode(ledPin, OUTPUT);
  // initialize the pushbutton pin as an input:
  pinMode(buttonPin, INPUT);
}

void loop() {
  // read the state of the pushbutton value:
  buttonState = digitalRead(buttonPin);

  // check if the pushbutton is pressed. If it is, the buttonState is HIGH:
  if (buttonState == HIGH)
  if (pressed == false)
   { flag=!flag; pressed = true }
    // turn LED off:
    digitalWrite(ledPin, flag);

}
Algorithm
Step 1 set pin 27 as output for button
Step 2 Set pin 26 as output for LED 1
Step 3 set LED 1 as output
Step 4 Set Button as input
Step 5: when button is pressed turn on the LED if it is off, turn OFF the LED if it is ON.
Step 6: Go to step 5
There was a problem in the ouput. The led was not getting turned off immediately.
Debouncing
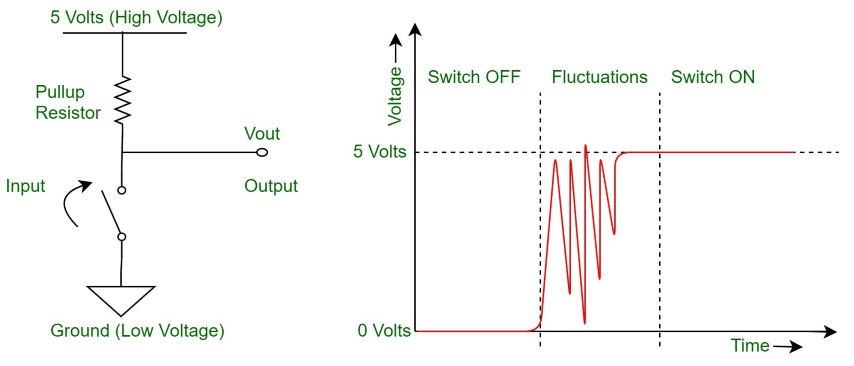
Sometimes we might encounter a problem called bouncing wherein errors may occur and cause misinterpretation of button press. This can be fixed by a method called debouncing
Adding Delay
const int buttonPin = 27;  // the number of the pushbutton pin
const int ledPin = 26;    // the number of the LED pin
bool flag = false;
// variables will change:
int buttonState = 0;  // variable for reading the pushbutton status

void setup() {
  // initialize the LED pin as an output:
  pinMode(ledPin, OUTPUT);
  // initialize the pushbutton pin as an input:
  pinMode(buttonPin, INPUT);
}

void loop() {
  // read the state of the pushbutton value:
  buttonState = digitalRead(buttonPin);

  // check if the pushbutton is pressed. If it is, the buttonState is HIGH:
  if (buttonState == HIGH)
   { delay(200);flag=!flag; }
    // turn LED off:
    digitalWrite(ledPin, flag);

}
Adding Pressed
const int buttonPin = 27;  // the number of the pushbutton pin
const int ledPin = 26;     // the number of the LED pin
bool flag = false;
bool pressed = false;
// variables will change:
int buttonState = 0;  // variable for reading the pushbutton status

void setup() {
  // initialize the LED pin as an output:
  pinMode(ledPin, OUTPUT);
  // initialize the pushbutton pin as an input:
  pinMode(buttonPin, INPUT);
}

void loop() {
  // read the state of the pushbutton value:
  buttonState = digitalRead(buttonPin);

  // check if the pushbutton is pressed. If it is, the buttonState is HIGH:
  if (buttonState == HIGH) {
    if (pressed == false) {
      flag = !flag;
      pressed = true;
    }

  } else {
    pressed = false; delay(50);
  }
  digitalWrite(ledPin, flag);
}
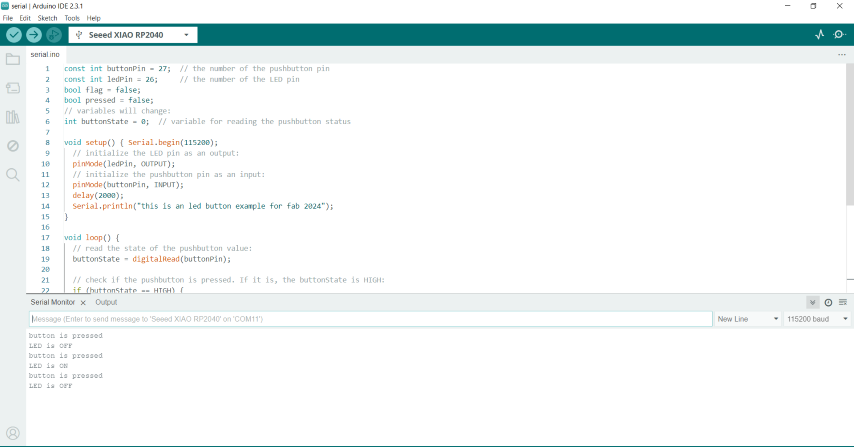
Serial Communication
Serial communication is the process of sequentially transferring the information/bits on the same channel. Due to this, the cost of wire will be reduced, but it slows the transmission speed. Generally, communication can be described as the process of interchanging information between individuals in the form of audio, video, verbal words, and written documents.
Serial Monitor
The serial monitor is
the 'tether' between the computer and Arduino
- it lets you send and receive text messages, handy for debugging and also controlling the Arduino from a keyboard!
Baud rate
Baud rate is
the measure of the number of changes to the signal (per second) that propagate through a transmission medium
. The baud rate may be higher or lower than the bit rate, which is the number of bits per second that the user can push through the transmission system.
const int buttonPin = 27;  // the number of the pushbutton pin
const int ledPin = 26;     // the number of the LED pin
bool flag = false;
bool pressed = false;
// variables will change:
int buttonState = 0;  // variable for reading the pushbutton status

void setup() { Serial.begin(115200);
  // initialize the LED pin as an output:
  pinMode(ledPin, OUTPUT);
  // initialize the pushbutton pin as an input:
  pinMode(buttonPin, INPUT);
  delay(2000);
  Serial.println("this is an led button example for fab 2024");
}

void loop() {
  // read the state of the pushbutton value:
  buttonState = digitalRead(buttonPin);

  // check if the pushbutton is pressed. If it is, the buttonState is HIGH:
  if (buttonState == HIGH) {
    if (pressed == false) { Serial.println("button is pressed");
      flag = !flag;
      Serial.print("LED is ");
      Serial.println(flag? "ON" : "OFF");
      pressed = true;
    }

  } else {
    pressed = false; delay(50);
  }
  digitalWrite(ledPin, flag);
}
Toggle
Now I generated a code to toggle the light one at a time using chatgpt.
This the prompt I gave; write an audino program to toggle 3 LEDS using a button in xiao rp2040
const int led1Pin = 26;
const int led2Pin = 0;
const int led3Pin = 1;
const int buttonPin = 27;

// Variable to store button state
int buttonState = 0;
int lastButtonState = 0;

// Counter to keep track of the current LED
int currentLED = 1;

void setup() {
  // Set LED pins as OUTPUT
  pinMode(led1Pin, OUTPUT);
  pinMode(led2Pin, OUTPUT);
  pinMode(led3Pin, OUTPUT);

  // Set button pin as INPUT
  pinMode(buttonPin, INPUT);
}

void toggleNextLED() {
  // Turn off all LEDs
  digitalWrite(led1Pin, LOW);
  digitalWrite(led2Pin, LOW);
  digitalWrite(led3Pin, LOW);

  // Turn on the current LED
  switch (currentLED) {
    case 1:
      digitalWrite(led1Pin, HIGH);
      break;
    case 2:
      digitalWrite(led2Pin, HIGH);
      break;
    case 3:
      digitalWrite(led3Pin, HIGH);
      break;
  }

  // Increment the counter for the next iteration
  currentLED = (currentLED % 3) + 1;
}

void loop() {
  // Read the state of the button
  buttonState = digitalRead(buttonPin);

  // Check if the button state has changed
  if (buttonState != lastButtonState) {
    // If the button is pressed, toggle the next LED
    if (buttonState == HIGH) {
      toggleNextLED();
    }

    // Save the current button state
    lastButtonState = buttonState;
  }
}
RGB lighting using Micro python
Installed thonny and followed the step in this
.png)
Input Device
IR sensor
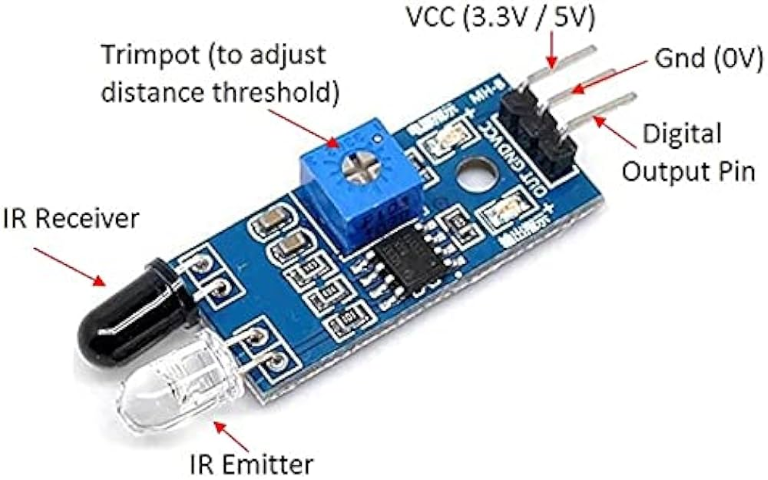
Tried generating a code for IR sensor
// Define the pin connected to the IR sensor output
      const int irSensorPin = 2;  // Assuming pin 2 is connected to the sensor output

      void setup() {
        // Initialize serial communication for debugging
        Serial.begin(9600);

        // Set IR sensor pin as input
        pinMode(irSensorPin, INPUT);
      }

      void loop() {
        // Read the state of the IR sensor
        int sensorValue = digitalRead(irSensorPin);

        // Check if object is detected
        if (sensorValue == HIGH) {
          Serial.println("Object detected!");
        } else {
          Serial.println("No object detected.");
        }

        // Wait a short delay before reading again
        delay(500);
      }
Output device
Micro servo
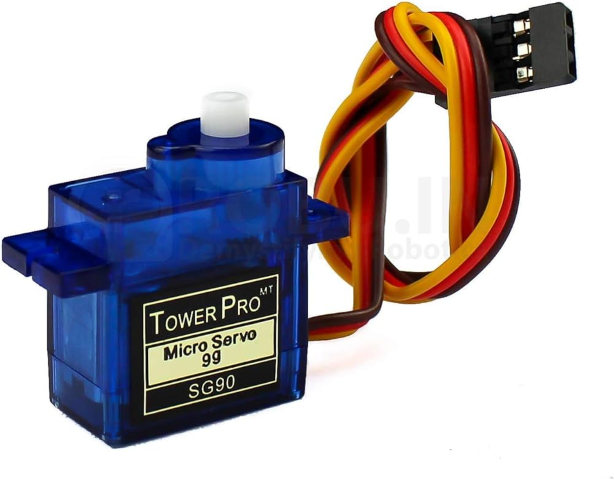
This is the code I used generated using chat gpt
#include <Servo.h>

Servo myservo;  // create servo object to control a servo
// twelve servo objects can be created on most boards

int pos = 0;    // variable to store the servo position

void setup() {
  myservo.attach(2);  // attaches the servo on pin 9 to the servo object
}

void loop() {
  for (pos = 0; pos <= 360; pos += 1) { // goes from 0 degrees to 180 degrees
    // in steps of 1 degree
    myservo.write(pos);              // tell servo to go to position in variable 'pos'
    delay(15);                       // waits 15 ms for the servo to reach the position
  }
  for (pos = 180; pos >= 0; pos -= 1) { // goes from 180 degrees to 0 degrees
    myservo.write(pos);              // tell servo to go to position in variable 'pos'
    delay(15);                       // waits 15 ms for the servo to reach the position
  }
}
Group assignment
Browse through the data sheet for your microcontroller
compare the performance and development workflows for other architectures
You can find the link here